Writing to OpenShift Express File System

One of the features that you will not find in most Platform as a Service solutions is writing to file system. Writing to file system is very important as you need it in case you want to write user uploaded content to file system, or write lucene index or read some configuration file from a directory. OpenShift Express from the start support writing to file system.

In this blog I will create a simple Spring MVC MongoDB application which store movie documents. I will be using Spring Roo to quickly scaffold the application. Spring Roo does not provide file upload functionality so I will modify the default application to add that support. Then I will deploy the application to OpenShift Express.

Creating a OpenShift Express JBoss AS7 application

The first step is to create the JBoss AS7 applictaion in OpenShift Express. To do that type the command as shown below. I am assuming you have OpenShift Express Ruby gem installed on your machine.

rhc-create-app -l <rhlogin email> -a movieshop -t jbossas-7.0 -d

This will create a sample Java web application which you can view at http://movieshop-<namespace&gt;.rhcloud.com.

Adding support for MongoDB Cartridge

As we are creating Spring MongoDB application we should add support for MongoDB by executing the command as shown below.

rhc-ctl-app -l <rhlogin email> -a movieshop -e add-mongodb-2.0 -d

Removing default generated file from git

We don’t need the default generated files so remove them by executing following commands.

git rm -rf src pom.xml
git commit -a -m "removed default generated files"

Creating Spring MVC MongoDB MovieShop Application

Fire the Roo shell and execute the following commands to create the application.

project --topLevelPackage com.xebia.movieshop --projectName movieshop --java 6
mongo setup
entity mongo --class ~.domain.Movie
repository mongo --interface ~.repository.MovieRepository
service --interface ~.service.MovieService
field string --fieldName title --notNull
field string --fieldName description --notNull --sizeMax 4000
field string --fieldName stars --notNull
field string --fieldName director --notNull
web mvc setup
web mvc all --package ~.web

Adding file upload support

Add two fields to Movie entity as shown below.

@Transient
private CommonsMultipartFile file;
private String fileName;

public CommonsMultipartFile getFile() {
    return this.file;
}
public void setFile(CommonsMultipartFile file) {
    this.file = file;
}
public String getFileName() {
   return fileName;
}
public void setFileName(String fileName) {
   this.fileName = fileName;
}

Edit the create.jspx file as shown below to add file upload as shown below.

<?xml version="1.0" encoding="UTF-8" standalone="no"?>
<div xmlns:c="http://java.sun.com/jsp/jstl/core" xmlns:field="urn:jsptagdir:/WEB-INF/tags/form/fields" xmlns:form="urn:jsptagdir:/WEB-INF/tags/form" xmlns:jsp="http://java.sun.com/JSP/Page" xmlns:spring="http://www.springframework.org/tags" version="2.0">
    <jsp:directive.page contentType="text/html;charset=UTF-8"/>
    <jsp:output omit-xml-declaration="yes"/>
    <form:create id="fc_com_xebia_movieshop_domain_Movie" modelAttribute="movie" path="/movies" render="${empty dependencies}" z="wysyQcUIaJOAUzNYNVt5nMEdvHk=" multipart="true">
        <field:input field="title" id="c_com_xebia_movieshop_domain_Movie_title" required="true" z="SpYrTojoyx2F7X5CjEfFQ6CBdA4="/>
        <field:textarea field="description" id="c_com_xebia_movieshop_domain_Movie_description" required="true" z="vxiB62k7E7FzhnVz1kU7CCIYEkw="/>
        <field:input field="stars" id="c_com_xebia_movieshop_domain_Movie_stars" required="true" z="XdvY0mpBitMGzrARD3TmTxxXZHg="/>
        <field:input field="director" id="c_com_xebia_movieshop_domain_Movie_director" required="true" z="6L8yvzx1cZgTq0QKP1dHbGHbQxI="/>
        <field:input field="file" id="c_com_shekhar_movieshop_domain_Movie_file" label="Upload image" type="file" z="user-managed"/>
        <field:input field="fileName" id="c_com_xebia_movieshop_domain_Movie_fileName" z="user-managed" render="false"/>
    </form:create>
    <form:dependency dependencies="${dependencies}" id="d_com_xebia_movieshop_domain_Movie" render="${not empty dependencies}" z="nyAj+bBGTpzOr2SwafD6lx7vi30="/>
</div>

Also change the input.tagx file to add support for input type file. Add the following line as shown below

<c:when test="${type eq 'file'}">
      <form:input id="_${sec_field}_id" path="${sec_field}" disabled="${disabled}"  type="file"/>
</c:when>

Modify the MovieController to write file either to the OpenShift_DATA_DIR or my local machine in case System.getEnv(“OPENSHIFT_DATA_DIR”) is null. The code is shown below.

import java.io.File;
import java.io.FileInputStream;
import java.io.UnsupportedEncodingException;
import java.math.BigInteger;

import javax.servlet.ServletOutputStream;
import javax.servlet.http.HttpServletRequest;
import javax.servlet.http.HttpServletResponse;
import javax.validation.Valid;

import org.apache.commons.io.IOUtils;
import org.springframework.beans.factory.annotation.Autowired;
import org.springframework.roo.addon.web.mvc.controller.scaffold.RooWebScaffold;
import org.springframework.stereotype.Controller;
import org.springframework.ui.Model;
import org.springframework.validation.BindingResult;
import org.springframework.web.bind.annotation.PathVariable;
import org.springframework.web.bind.annotation.RequestMapping;
import org.springframework.web.bind.annotation.RequestMethod;
import org.springframework.web.bind.annotation.RequestParam;
import org.springframework.web.multipart.commons.CommonsMultipartFile;
import org.springframework.web.util.UriUtils;
import org.springframework.web.util.WebUtils;

import com.xebia.movieshop.domain.Movie;
import com.xebia.movieshop.service.MovieService;

@RequestMapping("/movies")
@Controller
@RooWebScaffold(path = "movies", formBackingObject = Movie.class)
public class MovieController {

	private static final String STORAGE_PATH = System.getEnv("OPENSHIFT_DATA_DIR") == null ? "/home/shekhar/tmp/" : System.getEnv("OPENSHIFT_DATA_DIR");

	@Autowired
    MovieService movieService;

	@RequestMapping(method = RequestMethod.POST, produces = "text/html")
	public String create(@Valid Movie movie, BindingResult bindingResult,
			Model uiModel, HttpServletRequest httpServletRequest) {
		if (bindingResult.hasErrors()) {
			populateEditForm(uiModel, movie);
			return "movies/create";
		}
		CommonsMultipartFile multipartFile = movie.getFile();
		String orgName = multipartFile.getOriginalFilename();
		uiModel.asMap().clear();
		System.out.println(orgName);
		String[] split = orgName.split("\\.");
		movie.setFileName(split[0]);
		movie.setFile(null);
		movieService.saveMovie(movie);
		String filePath = STORAGE_PATH + orgName;
		File dest = new File(filePath);

		try {
			multipartFile.transferTo(dest);
		} catch (Exception e) {
			throw new RuntimeException(e);
		}
		return "redirect:/movies/"
				+ encodeUrlPathSegment(movie.getId().toString(),
						httpServletRequest);
	}

	@RequestMapping(value = "/image/{fileName}", method = RequestMethod.GET)
	public void getImage(@PathVariable String fileName, HttpServletRequest req, HttpServletResponse res) throws Exception{
		File file = new File(STORAGE_PATH+fileName+".jpg");
		res.setHeader("Cache-Control", "no-store");
		res.setHeader("Pragma", "no-cache");
		res.setDateHeader("Expires", 0);
		res.setContentType("image/jpg");
		ServletOutputStream ostream = res.getOutputStream();
		IOUtils.copy(new FileInputStream(file), ostream);
		ostream.flush();
		ostream.close();
	}

Also change the show.jspx file to display the image.

<?xml version="1.0" encoding="UTF-8" standalone="no"?>
<div xmlns:field="urn:jsptagdir:/WEB-INF/tags/form/fields" xmlns:jsp="http://java.sun.com/JSP/Page" xmlns:page="urn:jsptagdir:/WEB-INF/tags/form" version="2.0">
    <jsp:directive.page contentType="text/html;charset=UTF-8"/>
    <jsp:output omit-xml-declaration="yes"/>
    <page:show id="ps_com_xebia_movieshop_domain_Movie" object="${movie}" path="/movies" z="2GhOPmD72lRGGsTvy9DYx8/b/b4=">
        <field:display field="title" id="s_com_xebia_movieshop_domain_Movie_title" object="${movie}" z="L3rzNq9mt4vOBL/2S9L5XTn4pGA="/>
        <field:display field="description" id="s_com_xebia_movieshop_domain_Movie_description" object="${movie}" z="rctpFQukL584DSNTEhcZ/zqm19U="/>
        <field:display field="stars" id="s_com_xebia_movieshop_domain_Movie_stars" object="${movie}" z="Mi3QNsQkI5hqOVW44XwXAGF2zKE="/>
        <field:display field="director" id="s_com_xebia_movieshop_domain_Movie_director" object="${movie}" z="rhXx3l+3zMxx0O0ht2Td3Icx1ZE="/>
        <field:display field="fileName" id="s_com_xebia_movieshop_domain_Movie_fileName" object="${movie}" z="7XTMedYLsWVvZkq2fKT0EZpZaPE="/>
        <IMG alt="${movie.fileName}" src="/movieshop/movies/image/${movie.fileName}" />
    </page:show>
</div>

Finally change the webmvc-config.xml to have CommonsMultipartResolver bean as shown below.

<bean
		class="org.springframework.web.multipart.commons.CommonsMultipartResolver"
		id="multipartResolver" >
		<property name="maxUploadSize" value="100000"></property>
	</bean>

Pointing to OpenShift MongoDB datastore

Change the applicationContext-mongo.xml to point to OpenShift MongoDB instance as shown below.

<mongo:db-factory dbname="${mongo.name}" host="${OPENSHIFT_NOSQL_DB_HOST}"
			port="${OPENSHIFT_NOSQL_DB_PORT}" username="${OPENSHIFT_NOSQL_DB_USERNAME}"
			password="${OPENSHIFT_NOSQL_DB_PASSWORD}" />

Add OpenShift Maven Profile

OpenShift applications require maven profile called openshift which is executed when git push is done.

<profiles>
		<profile>
			<!-- When built in OpenShift the 'openshift' profile will be used when
				invoking mvn. -->
			<!-- Use this profile for any OpenShift specific customization your app
				will need. -->
			<!-- By default that is to put the resulting archive into the 'deployments'
				folder. -->
			<!-- http://maven.apache.org/guides/mini/guide-building-for-different-environments.html -->
			<id>openshift</id>
			<build>
				<finalName>movieshop</finalName>
				<plugins>
					<plugin>
						<artifactId>maven-war-plugin</artifactId>
						<version>2.1.1</version>
						<configuration>
							<outputDirectory>deployments</outputDirectory>
							<warName>ROOT</warName>
						</configuration>
					</plugin>
				</plugins>
			</build>
		</profile>
	</profiles>

Deploying Application to OpenShift

finally do git push to deploy the application to OpenShift and you can view the application running at http://movieshop-random.rhcloud.com/

Using MongoDB Replica Set With Spring MongoDB 1.0.0.RC1

The primary means for replication is to ensure data survives single or multiple machine failures. The more replicas you have, the more likely is your data to survive one or more hardware crashes. With three replicas, you can afford to lose two nodes and still serve the data. MongoDB supports two forms of replication, Replica Sets and Master Slave. Replica Sets is the recommended way to do replication in MongoDB and will cover only Replica Sets in this post.

Couple of weeks back I was working in POC where we need to set up MongoDB replication. As I am Spring aficionado I decided to use Spring MongoDB to interact with Replica Set. We used Spring Roo to quickly bootstrap the project. All the project setup, Spring MongoDB setup, JUnit test cases, evern Spring MVC UI was created in minutes thanks to Spring Roo. I am big Spring Roo fan — I just love it. Thanks SpringSource for such an amazing project. Spring Roo uses Spring MongoDB version 1.0.0.M5 which has a bug that it does not support WriteConcern value REPLICAS_SAFE. But with the current release 1.0.0.RC1 that issue has been fixed and now you can use REPLICAS_SAFE. REPLICAS_SAFE is the recommended value for WriteConcern in case of replication.  This is a step by step guide from creation of Spring project to working MongoDB replica set.

  1. Create the project using Spring Roo. If you are not aware of Spring Roo you can read my Spring Roo series. I am using Spring Roo to quickly configure a Spring MongoDB project.
    project --topLevelPackage com.xebia.mongodb.replication --projectName mongodb-replication-demo --java 6
    mongo setup --databaseName bookshop --host localhost --port 27017
    entity mongo --class ~.domain.Book --testAutomatically --identifierType org.bson.types.ObjectId
    field string --fieldName title --notNull
    field string --fieldName author --notNull
    field number --type double --fieldName price --notNull
    repository mongo --interface ~.repository.BookRepository --entity ~.domain.Book
    

    This will create a Spring maven project, configure MongoDB to work with Spring, create one Collection Book and will add three fields title, author, and price to the collection. All the CRUD operations will carried out using BookRepository.

  2.  Start the MongoDB server using ./mongod and run BookIntegrationTest and make sure all tests pass.
  3. Setup replica set following the MongoDB documentation http://www.mongodb.org/display/DOCS/Replica+Set+Tutorial.
  4. Update the applicationContext-mongo.xml as shown below but before add the property mongo.replicaset which will have all nodes.
    <?xml version="1.0" encoding="UTF-8" standalone="no"?>
    <beans xmlns="http://www.springframework.org/schema/beans" xmlns:cloud="http://schema.cloudfoundry.org/spring" xmlns:context="http://www.springframework.org/schema/context" xmlns:mongo="http://www.springframework.org/schema/data/mongo" xmlns:xsi="http://www.w3.org/2001/XMLSchema-instance" xsi:schemaLocation="http://www.springframework.org/schema/context http://www.springframework.org/schema/context/spring-context-3.0.xsd        http://www.springframework.org/schema/data/mongo        http://www.springframework.org/schema/data/mongo/spring-mongo-1.0.xsd        http://www.springframework.org/schema/beans        http://www.springframework.org/schema/beans/spring-beans-3.0.xsd        http://schema.cloudfoundry.org/spring http://schema.cloudfoundry.org/spring/cloudfoundry-spring-0.8.xsd">
    
        <mongo:db-factory dbname="${mongo.database}" id="mongoDbFactory" mongo-ref="mongo"/>
    
        <mongo:repositories base-package="com.xebia.mongodb.replication"/>
    
        <!-- To translate any MongoExceptions thrown in @Repository annotated classes -->
        <context:annotation-config/>
    
        <bean class="org.springframework.data.mongodb.core.MongoTemplate" id="mongoTemplate">
            <constructor-arg ref="mongoDbFactory"/>
        </bean>
    
    	<mongo:mongo id="mongo" replica-set="${mongo.replicaset}" write-concern="REPLICA_SAFE">
    		<mongo:options auto-connect-retry="true"/>
    	</mongo:mongo>
    </beans>
    

    If you run the tests again all the tests will fail and you will see following exception.

    Caused by: org.springframework.beans.factory.BeanDefinitionStoreException: Unexpected exception parsing XML document from file [/home/shekhar/dev/workspaces/writing/mongodb-replication-demo/target/classes/META-INF/spring/applicationContext-mongo.xml]; nested exception is java.lang.ArrayIndexOutOfBoundsException: 1
    at org.springframework.beans.factory.xml.XmlBeanDefinitionReader.
    doLoadBeanDefinitions(XmlBeanDefinitionReader.java:412)
    

    The reason for this exception is because there is a bug in Spring MongoDB 1.0.0.M5 which is not able to parse WriteConcern REPLICA_SAFE value.

  5. To make it work we have to work with Spring MongoDB latest version 1.0.0.RC1. This is released just 3 days back on 7th December 2011.Update the pom.xml with 1.0.0.RC1.
     <dependency>
    	<groupId>org.springframework.data</groupId>
            <artifactId>spring-data-mongodb</artifactId>
            <version>1.0.0.RC1</version>
    </dependency>
    

    Run the BookIntegrationTest the tests will fail again and see the following exception stacktraces.

    java.lang.NoSuchMethodError: org.springframework.core.annotation.AnnotationUtils
    .getAnnotation(Ljava/lang/reflect/AnnotatedElement;Ljava/lang/Class;)
    Ljava/lang/annotation/Annotation;
    at org.springframework.transaction.annotation.SpringTransactionAnnotationParser
    .parseTransactionAnnotation(SpringTransactionAnnotationParser.java:38)
    
  6. To make it ran you have to use latest Spring version 3.1.0.RC2 in pom.xml
    <spring.version>3.1.0.RC2</spring.version>
    
  7. Final change you need to make is in applicationContext-mongo.xml. Change the value of write-concern to REPLICAS_SAFE.
    <mongo:mongo id="mongo" replica-set="${mongo.replicaset}" write-concern="REPLICAS_SAFE">
    	<mongo:options auto-connect-retry="true"/>
    </mongo:mongo>
    
  8. Run the tests and all the tests will pass.

How MongoDB Different Write Concern Values Affect Performance On A Single Node?

In the first post I talked about how indexes affect the write speed in MongoDB. In this second post I will share my findings on how different write concerns affect the write speed on a single node. Please refer to the first post for the setup related information.  A write concern controls the behavior of write operation and gives developers the choice to choose the value matching their requirements. For instance there are some documents which are not very important and if one of them get lost your business will not get screwed. For those you can choose less stricter value of write concern and for objects where you want don’t want your object to be lost you should choose stricter value of write concern. Let’s take a look at different write concern values available in Java driver. Please note in this experiment I used MongoDB java driver 2.7.2 instead of Spring MongoDB.

  1. Normal :  This is the default option where every write operation is fire and forget which means it just writes to the driver and return back. It does not wait for write to be available in server. So, if another thread tries to read the document just after the document has been written it  might found not find it. There is a very high probability of data loss with this option. I think this should not be considered in cases where data durability is important and you are only using single instance of MongoDB server. Even with replication you can loose data with this option (I will talk about in my future post).
  2. None : This is almost same as Normal with just one different that in Normal if network goes down or there is some other network issue you get an exception but with None you don’t get any exception if there are some network issues. This makes it highly unreliable.
  3. Safe : As suggested by name it is safer than the above two. The write operation waits for the MongoDB server to acknowledge the write but data is still not written to disk. With safe you will not face issue that when another thread tried to read the object you just wrote, the object was not found. So, it provides a guarantee that object once written will be found. That’s Good. But still you can loose data because data is not written to disk and if server died for some reason data will be lost.
  4. Journal Safe : Before we talk about this option. Lets first talk about what is Journaling in MongoDB. Journaling is a feature of MongDB where a write ahead log file of all the operations is maintained. In scenarios when MongoDB is not cleanly shutdown like using kill -9 command the data can be recovered from Journal files. By default data is written to journal files after every 100 milliseconds. You can change it to lie between 2 ms to 300 ms. With version 2.0 journaling is enable by default on 64 bit MongoDB servers. With Journal Safe write concern option your write will wait till the journal file is updated.
  5. Fysnc : With Fsync write concern the write operation waits till the data is not written to disk. This is the safest option on a Single node as only way you can loose data is when the hard disk crashes.

I have left the other values which are not applicable to single node but make more sense when replication is enable. I will cover them in future posts.

Test Case

The test case was very simple I will be doing 1 million writes with each of options except fsync and will find out the writes per second speed for each of the write concern values.

Document

The document is similar to the one used in first post. It is 2395 bytes.

{
"_id" : ObjectId("4eda74ef84ae8b2410f5fa8e"),
"age" : "27",
"lName" : "Gulati1",
"fName" : "Shekhar1"
"bio" : "I am a Java Developer. I am a Java Developer. I am a Java Developer. I am a Java Developer. I am a Java Developer. I am a Java Developer. I am a Java Developer. I am a Java Developer. I am a Java Developer. I am a Java Developer. I am a Java Developer. I am a Java Developer. I am a Java Developer. I am a Java Developer. I am a Java Developer. I am a Java Developer. I am a Java Developer. I am a Java Developer. I am a Java Developer. I am a Java Developer. I am a Java Developer. I am a Java Developer. I am a Java Developer. I am a Java Developer. I am a Java Developer. I am a Java Developer. I am a Java Developer. I am a Java Developer. I am a Java Developer. I am a Java Developer. I am a Java Developer. I am a Java Developer. I am a Java Developer. I am a Java Developer. I am a Java Developer. I am a Java Developer. I am a Java Developer. I am a Java Developer. I am a Java Developer. I am a Java Developer. I am a Java Developer. I am a Java Developer. I am a Java Developer. I am a Java Developer. I am a Java Developer. I am a Java Developer. I am a Java Developer. I am a Java Developer. I am a Java Developer. I am a Java Developer. I am a Java Developer. I am a Java Developer. I am a Java Developer. I am a Java Developer. I am a Java Developer. I am a Java Developer. I am a Java Developer. I am a Java Developer. I am a Java Developer. I am a Java Developer. I am a Java Developer. I am a Java Developer. I am a Java Developer. I am a Java Developer. I am a Java Developer. I am a Java Developer. I am a Java Developer. I am a Java Developer. I am a Java Developer. I am a Java Developer. I am a Java Developer. I am a Java Developer. I am a Java Developer. I am a Java Developer. I am a Java Developer. I am a Java Developer. I am a Java Developer. I am a Java Developer. I am a Java Developer. I am a Java Developer. I am a Java Developer. I am a Java Developer. I am a Java Developer. I am a Java Developer. I am a Java Developer. I am a Java Developer. I am a Java Developer. I am a Java Developer. I am a Java Developer. I am a Java Developer. I am a Java Developer. I am a Java Developer. I am a Java Developer. I am a Java Developer. I am a Java Developer. I am a Java Developer. I am a Java Developer. I am a Java Developer. I am a Java Developer. I am a Java Developer. ",
}

JUnit Test

The JUnit test case is shown below. In each test case it inserts one million records with a different value of write concern.

public class SingleNodeWriteConcernTests {

	private final static int ONE_MILLION = 1000000;

	private final Logger logger = Logger
			.getLogger(SingleNodeWriteConcernTests.class);

	@Test
	public void shouldInsertRecordsInNonCurrentMode() throws Exception {
		ServerAddress serverAddress = new ServerAddress("localhost", 27017);

		Mongo mongo = new Mongo(serverAddress);
		mongo.setWriteConcern(WriteConcern.NONE);
		runASingleTestCase(mongo, "NONE");

		mongo = new Mongo(serverAddress);
		mongo.setWriteConcern(WriteConcern.JOURNAL_SAFE);
		runASingleTestCase(mongo, "JOURNAL_SAFE");

		mongo = new Mongo(serverAddress);
		mongo.setWriteConcern(WriteConcern.NORMAL);
		runASingleTestCase(mongo, "NORMAL");

		mongo = new Mongo(serverAddress);
		mongo.setWriteConcern(WriteConcern.SAFE);
		runASingleTestCase(mongo, "SAFE");

	}

	private void runASingleTestCase(Mongo mongo, String name) throws Exception {
		DB db = mongo.getDB("play");
		DBCollection people = db.getCollection("people");
		if (db.collectionExists("people")) {
			people.drop();
		}
		insertRecords(mongo, name);

		mongo.dropDatabase("play");
	}

	private void insertRecords(Mongo mongo, final String name) throws Exception {

		DB db = mongo.getDB("play");
		final DBCollection collection = db.getCollection("people");
		collection.ensureIndex("fName");
		long startTime = System.currentTimeMillis();
		for (int i = 1; i <= ONE_MILLION; i++) {
			BasicDBObject obj = new BasicDBObject();
			Map<String, String> map = new HashMap<String, String>();
			map.put("fName", "Shekhar" + i);
			map.put("lName", "Gulati" + i);
			map.put("age", String.valueOf(i));
			map.put("bio", StringUtils.repeat("I am a Java Developer. ", 100));
			obj.putAll(map);
			collection.insert(obj);
		}
		long endTime = System.currentTimeMillis();
		double seconds = ((double) (endTime - startTime)) / (1000);
		double rate = ONE_MILLION / seconds;

		String message = String
				.format("WriteConcern %s inserted %d records in %.2f seconds at %.2f (rec/s)",
						name, ONE_MILLION, seconds, rate);
		logger.info(message);

	}

}

Results

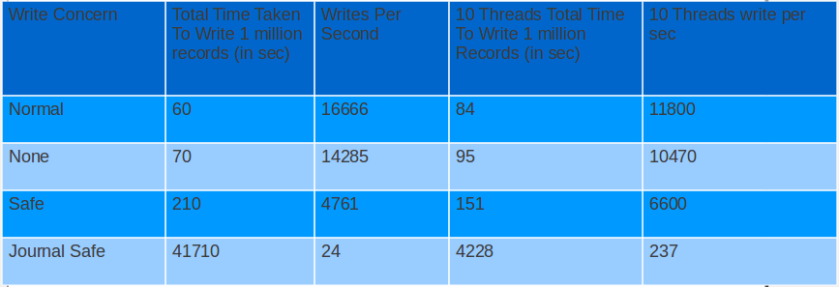
As you might have also expected Normal and None are the fastest because of the way they work i.e. fire and forget. Safe writes takes 3.5 times more than Normal writes. With Journal safe value you come down to 24 documents per second which is very low. As you can see as you move towards more write safety you loose a lot on write speed. This is again a decision you have to make depending on your use case.

Can something be done to increase write speed in Safe and Journal Safe options?

The results shown above are based on records being inserted sequentially one at a time. I tried an experiment where in I divided 1 million records to a batch of 100,000 records each. And let 10 threads write 1 million record in parallel.  The write speed for Safe and Journal Safe increased but None and Normal decreased as shown below.

The write speed for Safe with 10 threads is 1.4 times the write speed with one thread and similarly write speed for Journal Safe is 10 times of the write speed with one thread. This is because while one thread is waiting other threads can work in parallel which allows to better utilize CPU.

How MongoDB write/read speed varies with or without index on a field?

Last 3 weeks I have been busy working on a PoC where we are thinking of using MongoDB as our datastore. In this series of blog posts I will be sharing my finding with the community. Please take these experiments with grain of salt and try out these experiments on your dataset and hardware. Also share with me if I am doing something stupid.  In this blog I will be sharing my findings on how index affect the write speed.

Scenario

I will be inserting 60 million documents and will be noting the time taken to write each batch of 10 million records.  The average document size is 2400 bytes (Look at the document in under Document heading). The test will be run first without index on the name field and then with index on the name field.

Conclusion

Write speed with index dropped to 0.27 times of write speed without index after inserting 20 million documents. 

Setup 

Dell Vostro Ubuntu 11.04 box with 4 GB RAM and 300 GB hard disk.

Java 6

MongoDB 2.0.1

Spring MongoDB 1.0.0.M5 which internally uses MongoDB Java driver 2.6.5 version.

Document

The documents I am storing in MongoDB looks like as shown below. The average document size is 2400 bytes.  Please note the _id field also has an index. The index that I will be creating will be on name field.

{
"_id" : ObjectId("4ed89c140cf2e821d503a523"),
"name" : "Shekhar Gulati",
"someId1" : NumberLong(1000006),
"str1" : "U",
"date1" : ISODate("1997-04-10T18:30:00Z"),
"bio" : "I am a Java Developer. I am a Java Developer. I am a Java Developer. I am a Java Developer. I am a Java Developer. I am a
Java Developer. I am a Java Developer. I am a Java Developer. I am a Java Developer. I am a Java Developer. I am a Java
Developer. I am a Java Developer. I am a Java Developer. I am a Java Developer. I am a Java Developer. I am a Java Developer. I
am a Java Developer. I am a Java Developer. I am a Java Developer. I am a Java Developer. I am a Java Developer. I am a Java
Developer. I am a Java Developer. I am a Java Developer. I am a Java Developer. I am a Java Developer. I am a Java Developer. I
am a Java Developer. I am a Java Developer. I am a Java Developer. I am a Java Developer. I am a Java Developer. I am a Java
Developer. I am a Java Developer. I am a Java Developer. I am a Java Developer. I am a Java Developer. I am a Java Developer. I
am a Java Developer. I am a Java Developer. I am a Java Developer. I am a Java Developer. I am a Java Developer. I am a Java
Developer. I am a Java Developer. I am a Java Developer. I am a Java Developer. I am a Java Developer. I am a Java Developer. I
am a Java Developer. I am a Java Developer. I am a Java Developer. I am a Java Developer. I am a Java Developer. I am a Java
Developer. I am a Java Developer. I am a Java Developer. I am a Java Developer. I am a Java Developer. I am a Java Developer. I
am a Java Developer. I am a Java Developer. I am a Java Developer. I am a Java Developer. I am a Java Developer. I am a Java
Developer. I am a Java Developer. I am a Java Developer. I am a Java Developer. I am a Java Developer. I am a Java Developer. I
am a Java Developer. I am a Java Developer. I am a Java Developer. I am a Java Developer. I am a Java Developer. I am a Java
Developer. I am a Java Developer. I am a Java Developer. I am a Java Developer. I am a Java Developer. I am a Java Developer. I
am a Java Developer. I am a Java Developer. I am a Java Developer. I am a Java Developer. I am a Java Developer. I am a Java
Developer. I am a Java Developer. I am a Java Developer. I am a Java Developer. I am a Java Developer. I am a Java Developer. I
am a Java Developer. I am a Java Developer. I am a Java Developer. I am a Java Developer. I am a Java Developer. I am a Java
Developer. I am a Java Developer. "
}

JUnit TestCases

The first JUnit test inserts 10 million record and after every 10 million records dumps the time taken to write batch of 10 million records. Perform  a find query on an unindexed field name and prints the time taken to perform the find operation. This tests runs for 6 batches so 60 million records are inserted.

@Configurable
@RunWith(SpringJUnit4ClassRunner.class)
@ContextConfiguration(locations = "classpath:/META-INF/spring/applicationContext*.xml")
public class Part1Test {

private static final String FILE_NAME = "/home/shekhar/dev/test-data/10mrecords.txt";

	private static final int TOTAL_NUMBER_OF_BATCHES = 6;

	private static final Logger logger = Logger
			.getLogger(SprintOneTestCases.class);

	@Autowired
	MongoTemplate mongoTemplate;

	@Before
	public void setup() {
		mongoTemplate.getDb().dropDatabase();
	}

	@Test
	public void shouldWrite60MillionRecordsWithoutIndex() throws Exception {

		for (int i = 1; i <= TOTAL_NUMBER_OF_BATCHES; i++) {
			logger.info("Running Batch ...." + i);
			long startTimeForOneBatch = System.currentTimeMillis();
		LineIterator iterator = FileUtils.lineIterator(new File(FILE_NAME));
			while (iterator.hasNext()) {
				String line = iterator.next();
				User user = convertLineToObject(line);
				mongoTemplate.insert(user);
			}

			long endTimeForOneBatch = System.currentTimeMillis();
			double timeInSeconds = ((double) (endTimeForOneBatch - startTimeForOneBatch)) / 1000;
			logger.info(String
					.format("Time taken to write %d batch of 10 million records is %.2f seconds",
							i, timeInSeconds));

			Query query = Query.query(Criteria.where("name").is(
					"Shekhar Gulati"));
			logger.info("Unindexed find query for name Shekhar Gulati");
			performFindQuery(query);
			performFindQuery(query);

			CommandResult collectionStats = mongoTemplate
					.getCollection("users").getStats();
			logger.info("Collection Stats : " + collectionStats.toString());

			logger.info("Batch finished running...." + i);
		}

	}

	private void performFindQuery(Query query) {
		long firstFindQueryStartTime = System.currentTimeMillis();
		List<User> query1Results = mongoTemplate.find(query, User.class);
		logger.info("Number of results found are " + query1Results.size());
		long firstFindQueryEndTime = System.currentTimeMillis();
		logger.info("Total Time Taken to do a find operation "
				+ (firstFindQueryEndTime - firstFindQueryStartTime) / 1000
				+ " seconds");
	}

	private User convertLineToObject(String line) {
		String[] fields = line.split(";");
		User user = new User();
		user.setFacebookName(toString(fields[0]));
		user.setSomeId1(toLong(fields[1]));
		user.setStr1(toString(fields[2]));
		user.setDate1(toDate(fields[3]));
		user.setBio(StringUtils.repeat("I am a Java Developer. ", 100));
		return user;
	}

	private long toLong(String field) {
		return Long.parseLong(field);
	}

	private Date toDate(String field) {
		SimpleDateFormat dateFormat = new SimpleDateFormat(
				"yyyy-MM-dd HH:mm:ss");
		Date date = null;
		try {
			date = dateFormat.parse(field);
		} catch (ParseException e) {
			date = new Date();
		}
		return date;
	}

	private String toString(String field) {
		if (StringUtils.isBlank(field)) {
			return "dummy";
		}
		return field;
	}

}

listing 1. 60 million records getting inserted and read without index

In the second test case I first created the index and then started inserting the records. This time find operations were performed on the indexed field name.

	@Test
	public void shouldWrite60MillionRecordsWithIndex()
			throws Exception {

		long startTime = System.currentTimeMillis();
		createIndex();

		for (int i = 1; i <= TOTAL_NUMBER_OF_BATCHES; i++) {
			logger.info("Running Batch ...." + i);
			long startTimeForOneBatch = System.currentTimeMillis();
		LineIterator iterator = FileUtils.lineIterator(new File(FILE_NAME));
			while (iterator.hasNext()) {
				String line = iterator.next();
				User obj = convertLineToObject(line);
				mongoTemplate.insert(obj);
			}

			long endTimeForOneBatch = System.currentTimeMillis();
			logger.info("Total Time Taken to write " + i
					+ " batch of Records in milliseconds : "
					+ (endTimeForOneBatch - startTimeForOneBatch));
	double timeInSeconds = ((double)(endTimeForOneBatch - startTimeForOneBatch))/1000;

                        logger.info(String.format("Time taken to write %d batch of 10 million records is %.2f seconds", i,timeInSeconds));

		Query query = Query.query(Criteria.where("name").is("Shekhar Gulati"));
			logger.info("Indexed find query for name Shekhar Gulati");
			performFindQuery(query);
			performFindQuery(query);

			CommandResult collectionStats = mongoTemplate.getCollection("name").getStats();
			logger.info("Collection Stats : " + collectionStats.toString());

			logger.info("Batch finished running...." + i);
		}

	}

	private void createIndex() {
		IndexDefinition indexDefinition = new Index("name", Order.ASCENDING)
				.named(" name_1");
		long startTimeToCreateIndex = System.currentTimeMillis();
		mongoTemplate.ensureIndex(indexDefinition, User.class);
		long endTimeToCreateIndex = System.currentTimeMillis();
		logger.info("Total Time Taken createIndex "
				+ (endTimeToCreateIndex - startTimeToCreateIndex) / 1000
				+ " seconds");
	}

Write Concern

WriteConcern value was NONE which is fire and forget. You can read more about write concerns here.

Write Resuts

After running the test cases shown above I found out that for the first 10 million i.e. from 0 to 10 million inserts write per second with index was 0.4 times of without index. The more surprising was that for the next batch of 10 million records the write speed with index was reduced to 0.27 times without index.

Looking at the table above you can see that the write speed when we don’t have index is remains consistent and does not degrades. But the write speed when we had index varied a lot from 3492 documents per second to 2281 documents per second. I was not able to complete the test after 20 million as it was taking way too much time to do next 10 million. This can lead to lot of problems in case you added index on a field after you have inserted first 10 million records without index. The write speed is not even consistent and you have to think of sharding to achieve the speed limits you want.

Read Results

Read results don’t show anything interesting except that you should have index on the field you would be querying on otherwise read performance will be very bad. This can be explained very easily because data will not be in RAM and you will be hitting disk. And when you hit disk performance will take a ride.

This is what all I have for this post. I am not making any judgement whether these numbers are good or bad. I think that should be governed by the use case, data, hardware you will working on. Please feel free to comment and share your knowledge.