This week I decided to write some Kotlin for fun. The best way to learn something while having fun is to build something with it. So, I decided to write a Bencode parser. From the Wikipedia[1],
Bencode is the encoding used by the peer-to-peer file sharing system BitTorrent for storing and transmitting loosely structured data.
Bencode supports four data types: Strings, Integers, Lists, and Dictionaries.
Strings are encoded as <string length encoded in base ten ASCII>:<string data>. So, spam becomes 4:spam
Integers are encoded as i<integer encoded in base ten ASCII>e. So, positive 3 becomes i3e and negative 3 becomes i-3e
Lists are encoded as l<bencoded values>e. So, list of [spam, eggs] become l4:spam4:eggse
Finally dictionaries are encoded as d<bencoded string><bencoded element>e. So, dictionary { "cow" => "moo", "spam" => "eggs" } becomes d3:cow3:moo4:spam4:eggse. You can have dictionary of any of the types supported.
I took the above examples from BitTorrent specification document[2].
Now that we understand about Bencode let’s start building the parser.
Create a Kotlin project
I use IntelliJ community edition for Java, Kotlin, and Scala related work that I do.
In can you don’t have IntelliJ installed on your machine you can download IntelliJ from the downloads link on their website and then Install it on your machine.
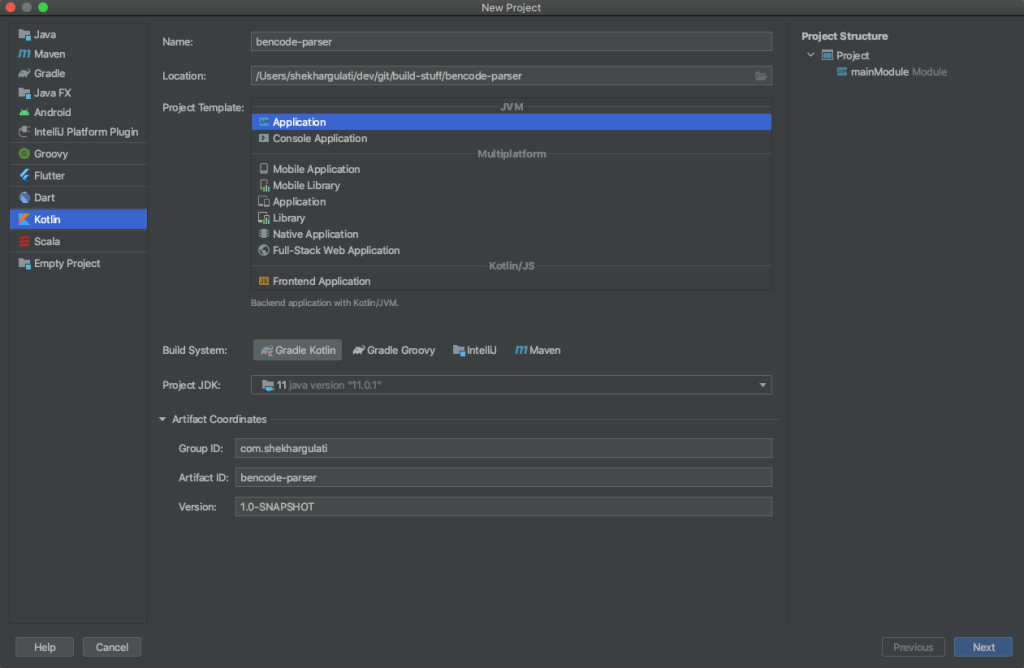
Once you have downloaded and installed IntelliJ you can create a new Kotlin project by following new project wizard. The first page will ask you the name of the project, project template, build tool, JDK, and Maven coordinates.
As shown below I am using JDK 11 with Gradle (with Kotlin script)
Once you press Next, it will ask you to choose the test framework and JVM version. We used Unit 5 and JVM 11.
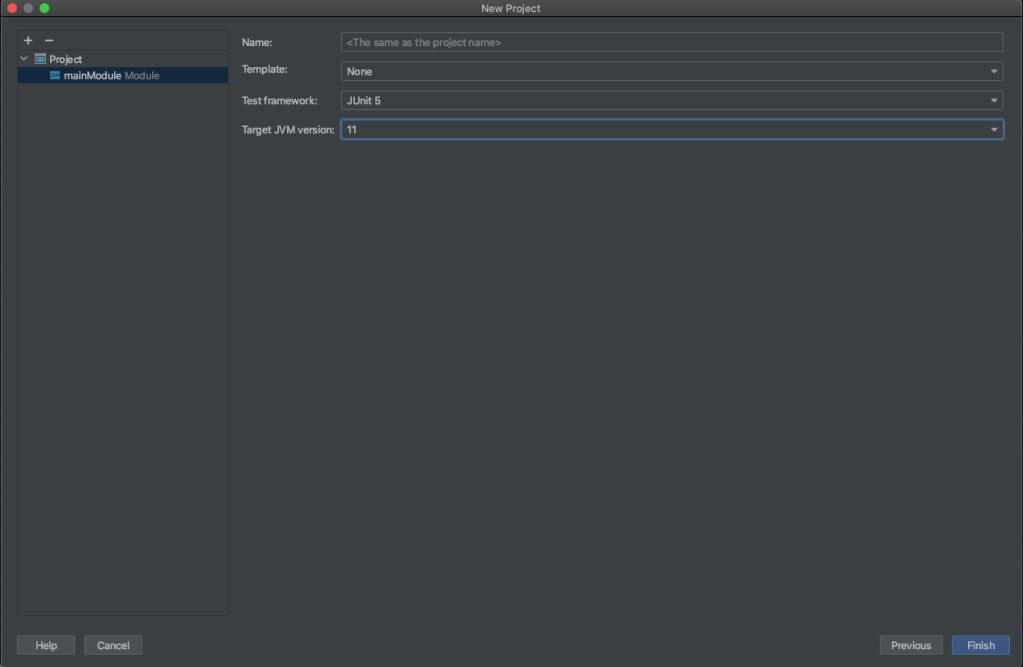
Press the Finish button. It will generate the project for you.
Please download and install JDK 11 on your machine.
To make sure the setup is working correctly I create a dummy test case and run the Gradle build. I expect my test to execute.
In case Gradle wrapper scripts are not generated please run
gradle wrapperinside your project root folder. To run the command you need Gradle installed.
So, let’s create a new Kotlin class BencodeParserTests inside the src/test source folder. We will create the class in the com.shekhargulati.bencode package.
Next, we will write a test that will fail so we will expect our build to fail as well.
package com.shekhargulati.beconde

import org.junit.jupiter.api.Assertions
import org.junit.jupiter.api.Test

class BencodeParserTests {

    @Test
    fun `should add two numbers`() {
        val a = 1
        val b = 2
        val c = a + b
        Assertions.assertEquals(4, c)
    }
}
As you can see in the above our test case should fail because 1+2=3 not 4.
Let’s run the build by executing ./gradlew clean build command inside the root project.
The build was successful. Ideally it should have failed since our test assertion is wrong.
$  ./gradlew clean build

BUILD SUCCESSFUL in 1s
5 actionable tasks: 5 executed
The problem is that JUnit configuration in build.gradle.kts is not right.
Replace the dependencies section with the one mentioned below.
dependencies {
    testImplementation("org.junit.jupiter:junit-jupiter-api:5.6.2")
    testRuntimeOnly("org.junit.jupiter:junit-jupiter-engine:5.6.2")
    testImplementation("org.assertj:assertj-core:3.17.2")
}
You have to explicitly specify the junit-engine that will run your tests.
Also, we have added assertj library for better assertions.
Next, we have to configure the Test task in the build.gradle.kts to use junit platform. The configuration is shown below.
tasks.withType<Test> {
    useJUnitPlatform()
}
Now, when you run the build it will fail.
> Task :test FAILED

BencodeParserTests > should add two numbers() FAILED
    org.opentest4j.AssertionFailedError at BencodeParserTests.kt:13

1 test completed, 1 failed
Let’s fix the test. We will also use assertj assertions. Now run the build again it will pass.
package com.shekhargulati.beconde

import org.assertj.core.api.Assertions.assertThat
import org.junit.jupiter.api.Test

class BencodeParserTests {

    @Test
    fun `should add two numbers`() {
        val a = 1
        val b = 2
        val c = a + b
        assertThat(c).isEqualTo(3)
    }
}
The gradle build is successful as shown below.
./gradlew clean build

BUILD SUCCESSFUL in 1s
5 actionable tasks: 5 executed
In my view when you are starting a new project always spend time ensuring that your setup is correct. These things become cost more time and pain later in the project lifecycle.
Writing the encode method
In the first section of the post you learnt that there are four types supported by Bencode. We also looked at the examples of each of types.
Let’s start by writing code for encoding the string.
We will start by writing our first test case. I will remove our dummy test case now.
@Test
fun `should encode string`() {
    val parser = BencodeParser()
    val encoded = parser.encode("spam")
    assertThat(encoded).isEqualTo("4:spam")
}
We started by creating the instance of BencodeParser. In Kotlin there is no new keyword.
Next, we called the encode method on BencodeParser and asserted the encoded value.
Since you have not written code for the BencodeParser you will get compilation errors.
Let’s write the BencodeParser class and the encode method.
class BencodeParser {

    fun encode(s: String): String {
        TODO("Not yet implemented")
    }

}
Your test will fail since encode method is not yet implemented.
The implementation of encode method is dead easy.
fun encode(s: String): String {
    return "${s.length}:$s"
}
The above also shows the Kotlin String interpolation in action. We created a new string from combining string length, :, and string itself.
Run the test and it will be green now. You can also write test for empty string. You should get 0:.
Let’s now write encoder for integers. We will start with the test case.
@Test
fun `should encode integer`() {
    val parser = BencodeParser()
    val encoded = parser.encode(3)
    assertThat(encoded).isEqualTo("i3e")
}
Our existing method works for String type. It shows compilation error when we pass Int type. One way we can fix it is by creating separate method for Int type like encodeInt. Other way could be to accept a super class and then do actions based on the type of the object. Kotlin when block supports writing such code as shown below.
Kotlin does not yet support union types. There is a discussion in Kotlin forums on the same topic. You can read it for more information.
fun encode(s: Any): String {
    return when (s) {
        is String -> "${s.length}:$s"
        is Int -> "i${s}e"
        else -> throw IllegalArgumentException("We don't understand $s")
    }
}
In the code above, we used Kotlin when block to check if the input is a String or an Int. Based on that we did the encoding.
Now that we have encoded simple types – String and Int let’s encode the list.
We will start by writing a couple of tests for lists.
@Test
fun `should encode a list`() {
    val parser = BencodeParser()
    val encoded = parser.encode(listOf("spam","eggs"))
    assertThat(encoded).isEqualTo("l4:spam4:eggse")
}

@Test
fun `should encode an empty list`() {
    val parser = BencodeParser()
    val encoded = parser.encode(emptyList<Any>())
    assertThat(encoded).isEqualTo("le")
}
The first tests for a list with two Strings and second test for the empty list.
The implementation is one liner for lists as well.
fun encode(s: Any): String {
    return when (s) {
        is String -> "${s.length}:$s"
        is Int -> "i${s}e"
        is List<*> -> s.map { encode(it!!) }.joinToString(separator = "", prefix = "l", postfix = "e")
        else -> throw IllegalArgumentException("We don't understand $s")
    }
}
We checked for the List type and then we just mapped over all the element calling encode method. Next, we joined the elements of the list. We used prefix as l, postfix as e and no separator. As you can see we are relying on recursion for encoding types.
Let’s now implement encoding for dictionary type. We will first write tests for the dictionary type as shown below.
@Test
fun `should encode a dictionary`() {
    val parser = BencodeParser()
    val encoded = parser.encode(mapOf("cow" to "moo", "spam" to "eggs"))
    assertThat(encoded).isEqualTo("d3:cow3:moo4:spam4:eggse")
}

@Test
fun `should encode empty dictionary`() {
    val parser = BencodeParser()
    val encoded = parser.encode(emptyMap<Any, Any>())
    assertThat(encoded).isEqualTo("de")
}
The implementation is similar to list. One thing to note here is that mapOf is based on LinkedHashMap so it maintains insertion order.
fun encode(s: Any): String {
    return when (s) {
        is String -> "${s.length}:$s"
        is Int -> "i${s}e"
        is List<*> -> s.map { encode(it!!) }.joinToString(separator = "", prefix = "l", postfix = "e")
        is Map<*, *> -> s.entries.map { (key, value) -> encode(key!!) + encode(value!!) }.joinToString(separator = "", prefix = "d", postfix = "e")
        else -> throw IllegalArgumentException("We don't understand $s")
    }
}
So, this completes the encode implementation.
Write the decode method
The decode method is more interesting as it will take input as String. It has to walk over the whole string and convert the parts as per the encoded types.
Let’s write decoder for specific types.
We can first write decoder for String. It takes encoded string and gives back decoded string and the location till it has read.
@Test
fun `should decode a string`() {
    val parser = BencodeParser()
    val decoded = parser.decodeString("4:spam")
    assertThat(decoded).isEqualTo(Pair("spam", 6))
}
In the test above we are decoding 4:spam. It will return decoded String spam and the location till it has read. Since it has read first 6 characters it return 6. The next decoder will use it to start from that position.
The implementation of decodeString is below.
fun decodeString(s: String): Pair<String, Int> {
    val lengthPart = s.split(":")[0]
    val digitsInString = lengthPart.length
    val length = lengthPart.toInt()
    return Pair(
        s.substring(digitsInString + 1, digitsInString + 1 + length),
        digitsInString + 1 + length
    )
}
In the code show above:
- We split the string by
:. The first part of the string is the length of String. We covert it to Int - Next, we find the number of digits in the length. In
4:spamlength part has one digit1. - We then created a pair of decoded part of the String (
spamin this example) and length it has read (6in the example)
Similarly we can write decode String to Int as shown below.
fun decodeInt(s: String): Pair<Int, Int> {
    val eIndex = s.indexOfFirst { it == 'e' }
    val i = s.substring(1, eIndex).toInt()
    return Pair(i, eIndex + 1)
}
It was easy for String and Int types as they could be decoded independently. Now, we have decode a list. Where each element could be of any other type.
Let’s start by implement decodeList method.
fun decodeList(s: String): Pair<List<Any>, Int> {
    val xs = mutableListOf<Any>()
    var currentChar: Char
    var index = 1
    while (index < s.length) {
        currentChar = s[index]
        if (currentChar == 'e') {
            index += 1
            break
        }
        val (b, i) = decode(s.substring(index))
        xs.add(b)
        index += i
    }
    return Pair(xs, index)
}
In the code shown above:
- We loop over the String
- If the current character is
ei..e we have reached the end of the list. Then we just break out of the while loop. - Else we decode the string by calling the
decodemethod. We will implement it next. The decode method will decide which decoder to call. - Add the decoded value to the result list.
- Finally we return the result
Before we implement decode method let’s implement decodeDict.
fun decodeDict(s: String): Pair<Map<Any, Any>, Int> {
    val dict = mutableMapOf<Any, Any>()
    var currentChar: Char
    var index = 1
    while (index < s.length) {
        currentChar = s[index]
        if (currentChar == 'e') {
            index += 1
            break
        }
        val (key, i1) = decode(s.substring(index))
        val (value, i2) = decode(s.substring(index + i1))
        dict[key] = value
        index += i1 + i2
    }
    return Pair(dict, index)
}
The decodeDictmethod is not very different from decodeList. We are decoding both key and value and adding to to the dict. And, finally we return the result.
Let’s now implement decode method. This method walks over the input string and call specific decoder for the conversion.
fun decode(s: String): Pair<Any, Int> {
    val currChar: Char
    var index = 0
    var result: Pair<Any, Int>? = null
    while (index < s.length) {
        currChar = s[index]
        when (currChar) {
            'i' -> {
                val (bencodeType, i) = decodeInt(s.substring(index))
                index += i
                result = Pair(bencodeType, index)
                break
            }
            'l' -> {
                val (bencodeType, i) = decodeList(s.substring(index))
                index += i
                result = Pair(bencodeType, index)
                break
            }
            'd' -> {
                val (bencodeType, i) = decodeDict(s.substring(index))
                index += i
                result = Pair(bencodeType, index)
                break
            }
            else -> {
                val (bencodeType, i) = decodeString(s.substring(index))
                index += i
                result = Pair(bencodeType, index)
                break
            }

        }
    }
    return result!!
}
To verify that our implementation is correct we can write a test as shown below.
@Test
fun `should decode a dictionary string`() {
    val encoded = "d9:publisher3:bob17:publisher-webpage15:www.example.com18:publisher.location4:homee"
    val parser = BencodeParser()
    val (result, _) = parser.decode(encoded)

    assertThat(result).isEqualTo(
        mapOf(
            "publisher" to "bob",
            "publisher-webpage" to "www.example.com",
            "publisher.location" to "home"
        )
    )
}
Resources
Discover more from Shekhar Gulati
Subscribe to get the latest posts sent to your email.
