Getting Started with vSphere
Today, I got an opportunity to work with vSphere. The plan for the day was to install vSphere on one of our machine and then connect to it using a Python API so that we can launch virtual machines. The official documentation lacked clarity and it was not easy for a newbie like me to get started with vSphere. Throughout the day we faced numerous problems, stumbled across many blogs and vmware forum posts, and finally managed to create our first VM via the official vSphere Python API — pyvmomi. In this detailed blog, I will go over all the steps required to get started with vSphere. We will start with how to install vSphere on a machine, then look at how to install command-line client on a linux machine, and finally learn how to talk to the vSphere host using Python. This blog is a work in progress and I will continue updating it as I learn more about vSphere.
We will be using vSphere version 6 in this tutorial.
Installing vSphere
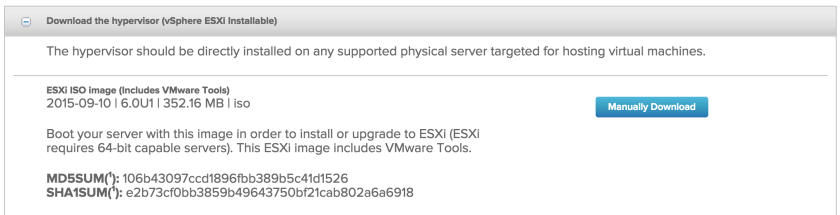
Step 1: Download vSphere ESXi ISO file
Let’s start with downloading vSphere ESXi ISO file. vSphere ESXi is the base hypervisor that is installed on each physical machine that will be used for hosting virtual machines. You can download the ISO file from https://my.vmware.com/group/vmware/evalcenter?p=vsphere6. You will be asked to login/register before you can download ESXi ISO file.
Step 2: Create bootable ESXi installer USB flash drive
Next create a bootable USB drive using the ISO downloaded in the first step. Please refer to http://www.virten.net/2014/12/howto-create-a-bootable-esxi-installer-usb-flash-drive/
Step 3: Boot physical machine using bootable USB flash drive
Now boot your machine using the bootable USB drive. Press F2 while system is booting up to go to the BIOS setup screen. Unselect the default booting sequence options. Only enable the bootable USB flash drive boot option. You also have to disable secure booting option.
Apply the changes and exit. It will restart the machine using the ESXi booter and install ESXi hypervisor. Refer to http://www.thegeekstuff.com/2010/06/vmware-esxi-installation-guide/
Step 4: Fix DHCP lookup failed exception
After installation you might get the error shown below. This is mentioned in the forum as well.
Warning: DHCP lookup failed. You may be unable to access this system until you customize its networking configuration.
To fix this error, you just have to restart management network. Press F2 and click on Restart Management Network.
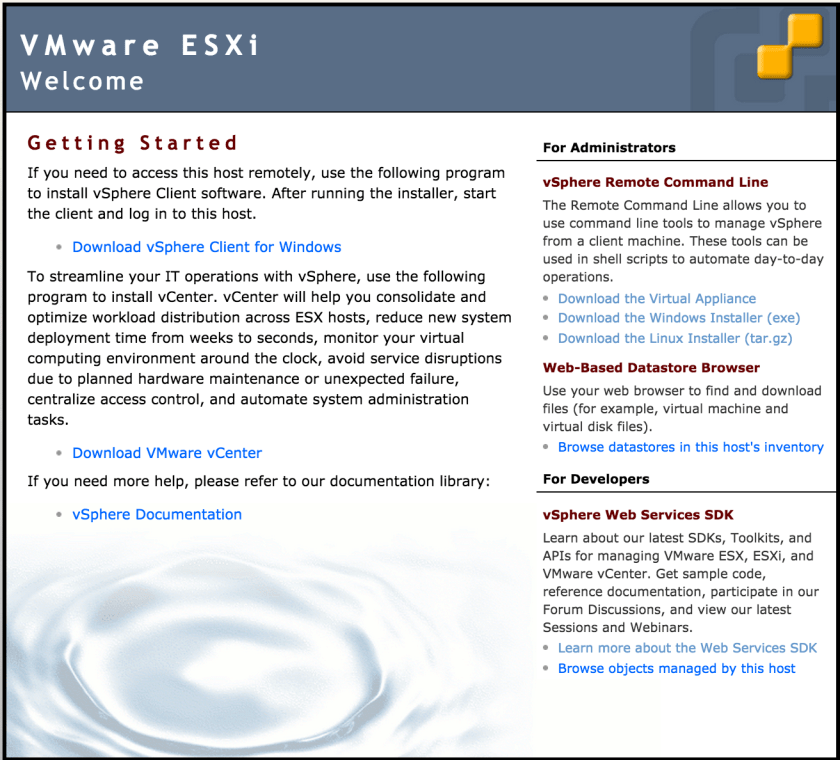
Step 5: Connecting to ESXi host from remote machine
The ESXi host by default is configured to use a local IP address, which is a subnet of 169.254.x.x/16. You can view the IP address on the ESXi server direct console. To allow your remote machine to connect to ESXi host you can override the local IP address by configuring a static IP address using the direct console F2 >> Configure Management Network >> IPv4 Configuration. Update the IPv4 Address value with static IP that you can connect from remote machine.
Once done, try to ping the machine from your local machine or open the https:// on your local machine. You will see the screen as shown below.
Installing command-line client
Step 1: Download the command-line client
Download tar.gz file from https://my.vmware.com/group/vmware/details?downloadGroup=VCLI600&productId=491.
Step 2: Create Ubuntu vagrant machine
$ vagrant init ubuntu/trusty64
Update Vagrantfile to increase memory settings.
Vagrant.configure(2) do |config|
config.vm.box = "ubuntu/trusty64"

config.vm.provider "virtualbox" do |vb|
vb.memory = "2048"
end
end
SSH into the vagrant file
$ vagrant up && vagrant ssh
Copy the command-line tar.gz file into the directory where Vagrantfile is created so that you can access it from within the VM.
Step 3: Install command-line client
Make sure you are inside the ubuntu box. Now first install following dependencies
$ sudo apt-get update
$ sudo apt-get install ia32-libs build-essential gcc uuid uuid-dev perl libssl-dev perl-doc liburi-perl libxml-libxml-perl libcrypt-ssleay-perl
If you get error like ia32-libs can’t be installed then you have to do following. More information here.
$ sudo dpkg --add-architecture i386
$ sudo apt-get update
$ sudo apt-get install libc6:i386 libncurses5:i386 libstdc++6:i386
Rerun the following command to install all dependencies
$ sudo apt-get install ia32-libs build-essential gcc uuid uuid-dev perl libssl-dev perl-doc liburi-perl libxml-libxml-perl libcrypt-ssleay-perl
Next do following to install command-line tools.
$ cd /vagrant
$ tar -zxfv VMware-vSphere-CLI-6.0.0-2503617.i386.tar.gz
$ sudo vmware-vsphere-cli-distrib/vmware-install.pl
This will install the command-line client. You can test that CLI is working by running the following command.
$ vicfg-hostops --server 192.168.19.20 --username root --password password --operation info
You will see output like as shown below.
Host Name : localhost.localdomain
Manufacturer : Dell Inc.
Model : Latitude E5540
Processor Type : Intel(R) Core(TM) i5-4210U CPU @ 1.70GHz
CPU Cores : 2 CPUs x 2394 GHz
Memory Capacity : 8097.58984375 MB
VMotion Enabled : no
In Maintenance Mode : no
Last Boot Time : 2015-09-29T14:01:25.94366Z
In case the above command give you error Server version unavailable at ‘https:///sdk/vimService.wsdl’ at /usr/lib/perl5/5.8.8/VMware/VICommon.pm line 545 then you can try following workaround. 1) Make sure the version of the LWP::UserAgent Perl module is above 6.0.4. 2) Turn off host name verification by running the following command: export PERL_LWP_SSL_VERIFY_HOSTNAME=0
I experience error mentioned above when I used 5.1 CLI tools with 6.0 server. Once I update the CLI to 6.0 version everything worked fine.
Working with Python API
Next, I focussed on how to use vSphere Python API to connect with ESXi host. We decided to use pyvmomi library.
Create a new virtualenv
$ virtualenv venv --python=python2.7
$ source venv/bin/activate
Clone the samples using git
$ git clone git@github.com:vmware/pyvmomi-community-samples.git
Install all the requirements using pip
$ pip install -r requirements.txt
To view all the VMs you will use following command. Make sure you are inside pyvmomi-community-samples directory.
$ python samples/getallvms.py -s 192.168.19.20 -u root -p password
You might get following warning because we are connecting to ESXi host using a self signed certificate.
/Users/shekhargulati/dev/tmp/vsphere-py/venv/pyVmomi/lib/python2.7/site-packages/requests/packages/urllib3/connectionpool.py:730: InsecureRequestWarning: Unverified HTTPS request is being made. Adding certificate verification is strongly advised. See: https://urllib3.readthedocs.org/en/latest/security.html (This warning will only appear once by default.)
InsecureRequestWarning)
To get rid of this warning you can following code snippet.
import requests
requests.packages.urllib3.disable_warnings()
You can update the getallvms.py with the two lines mentioned above.
To create a VM you can use following command.
$ python samples/create_random_marvel_vms.py -s 192.168.19.20 -u root -p password -c 1 --datastore datastore1
To create multiple VMs you can use following command.
$ python samples/create_random_marvel_vms.py -s 192.168.19.20 -u root -p password -c 3 --datastore datastore1
Now if you list all the vms you will see following output.
$ python samples/getallvms.py -s 192.168.19.20 -u root -p password

Name : MARVEL-Nomad
Path : [datastore1] MARVEL-Nomad/MARVEL-Nomad/MARVEL-Nomad.vmx
Guest : Microsoft MS-DOS
Instance UUID : 52475c74-ca6f-128f-7b09-87978e683c82
Bios UUID : 564dd51c-950d-1478-56c9-7653ef68ba80
State : poweredOff
VMware-tools: toolsNotInstalled
IP : None

Name : MARVEL-Professor_X_(Ultimate)
Path : [datastore1] MARVEL-Professor_X_(Ultimate)/MARVEL-Professor_X_(Ultimate)/MARVEL-Professor_X_(Ultimate).vmx
Guest : Microsoft MS-DOS
Instance UUID : 52d03c2c-fb05-98b0-9840-c27434192c6d
Bios UUID : 564d693d-b3ef-305b-96a3-1bd2936cabe0
State : poweredOff
VMware-tools: toolsNotInstalled
IP : None

Name : MARVEL-Cammi
Path : [datastore1] MARVEL-Cammi/MARVEL-Cammi/MARVEL-Cammi.vmx
Guest : Microsoft MS-DOS
Instance UUID : 52aabed1-2a3e-518f-0c55-917b592a3123
Bios UUID : 564d1e02-c17c-df61-ef50-6d2f2f11766e
State : poweredOff
VMware-tools: toolsNotInstalled
IP : None

Name : MARVEL-Darkstar
Path : [datastore1] MARVEL-Darkstar/MARVEL-Darkstar/MARVEL-Darkstar.vmx
Guest : Microsoft MS-DOS
Instance UUID : 52e05db7-04e6-5ba7-2d01-4d9ae87bae8b
Bios UUID : 564d50ff-3119-4267-3d7d-f44de66b4209
State : poweredOff
VMware-tools: toolsNotInstalled
IP : None
Discover more from Shekhar Gulati
Subscribe to get the latest posts sent to your email.

One thought on “Getting Started with vSphere EXSi — The Missing Tutorial”