Since last couple of years I have not learnt any new programming language so this week I decided to change that. I decided to learn Swift programming language.
Swift is a modern, multi-paradigm, compiled, statically typed, safe, open-source programming language by Apple. Most developers use it to build apps for Apple platforms – macOS, iOS, watchOS, tvOS and beyond.
I don’t build Apple apps for living. For most of software engineering life I have built web applications and backend services. So,the best way for me to learn a new language is to build a web application using it. In this tutorial series I will be building a web application from scratch using Swift. We will be using Vapor web framework. It is the most used web framework for Swift. Vapor is non-blocking and event-driven built on top of Apple’s SwiftNIO.
Installing Swift
Swift currently supports MacOS, Ubuntu, CentOS, and Amazon Linux 2 operating systems. If you are using Mac then Swift comes bundled with Xcode 11.5. You can download the latest version for Mac and other linux operating system from the official website.
This tutorial is written using Swift 5.2.4
Once you have installed Swift you should be able to check the run the following command.
$ swift --version
Apple Swift version 5.2.4 (swiftlang-1103.0.32.9 clang-1103.0.32.53)
Target: x86_64-apple-darwin19.4.0
You don’t have to type
$. It denotes command-prompt.
Swift also has a REPL tool inbuilt that you can run by just typing swift.
$ swift
Welcome to Apple Swift version 5.2.4 (swiftlang-1103.0.32.9 clang-1103.0.32.53).
Type :help for assistance.
  1>
You can now run different Swift statements. We will start by obligatory Hello, World!
  1> print("Hello, World!")
Hello, World!
We can declare variables using the var keyword and do basic math operation as shown below.
  4> var a = 1
a: Int = 1
  5> var b = 2
b: Int = 2
  6> a + b
$R0: Int = 3
We can create Arrays and append elements to them.
  9> var names = ["Shekhar", "Rahul", "Tom"]
names: [String] = 3 values {
  [0] = "Shekhar"
  [1] = "Rahul"
  [2] = "Tom"
}
 11> names.append("Bill")
 12> names
$R1: [String] = 4 values {
  [0] = "Shekhar"
  [1] = "Rahul"
  [2] = "Tom"
  [3] = "Bill"
}
 13> names[2]
$R2: String = "Tom"
You can also extract slice of the array using the range operator as shown below.
 16> names[0..<3]
$R3: ArraySlice<String> = 3 values {
  [0] = "Shekhar"
  [1] = "Rahul"
  [2] = "Tom"
}
We will learn more about Swift language as we move along in our tutorial series.
You can exit from the Swift REPL using either of the following – :quit, :exit, or Ctrl-D.
Installing vapor
On macOS, you can install vapor using brew package manager.
brew tap vapor/tap
brew install vapor/tap/vapor
You can run the version command to check vapor version as shown below.
$ vapor version
Vapor Toolbox: 3.1.10
For Ubuntu refer to the official documentation. You will have to build vapor toolbox project and add binaries to your path.
A Hello, World web application
Now, that we have all the prerequisites installed we can start building the application.
In this tutorial series, we will build a simple blogging engine. Let’s call our blogging engine bloggy.
We will use vapor CLI to generate the project structure of the web application.
$ vapor new --web bloggy
In the code shown above we used the --web option to tell Vapor to use template that generate a web application. It will add leaf templating engine to the dependencies. If we don’t use web option then api template will be used.
Make sure to change the directory to bloggy.
Let’s quickly build and run the web application.
$ vapor build
$ vapor run
The vapor build command will take some time the first time you run this command as it has to download all the dependencies.
The output of the run command will tell where app is running.
Running bloggy ...
Running default command: .build/debug/Run serve
Server starting on http://localhost:8080
We can see our app running at http://localhost:8080.
We can stop the server by Ctrl-D .
Open code in Xcode editor
I was planning to use VS Code as my editor for developing the web application but I realised that there is no official extension by Apple. Also, the one in the extension marketplace were broken so I decided to use Xcode.
To open the project in Xcode you can run the following vapor CLI command.
$ vapor xcode
This will build the project and open it in Xcode. You will also have build and run configuration setup.
The first thing I wanted to change in my run configuration was to use a different port. I develop Java web applications so port 8080 is consumed by my Java Spring Boot applications.
To change the port, click on the Edit Scheme configuration as shown below.
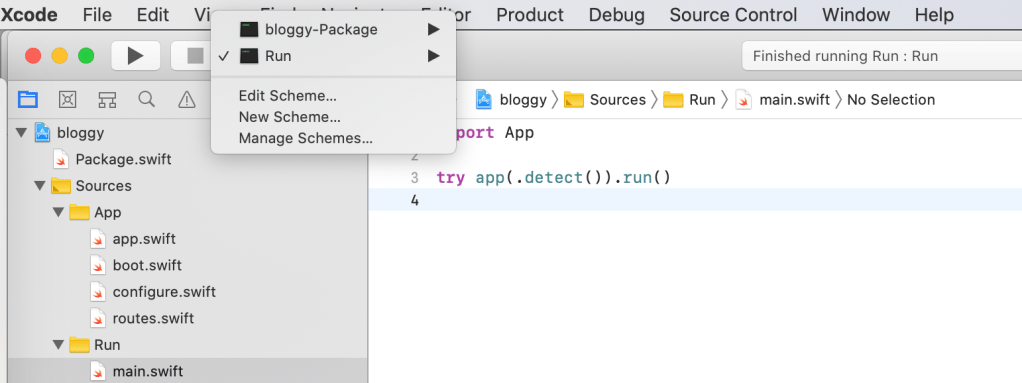
It will open a screen where we can add arguments --port 10000 that can be passed on launch as shown below. In the image shown below we are passing port number 10000.
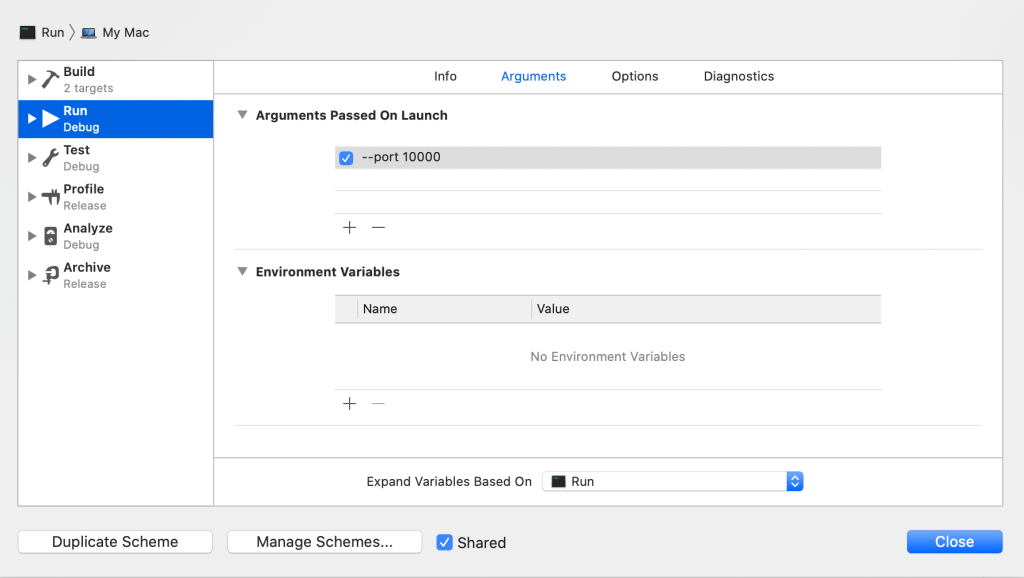
Close the screen and run the application by pressing ▶️ button. Your application will be accessible at http://localhost:10000
You can also pass the option from CLI
vapor run --port=10000. You will get a message that--port=10000is deprecated and you should use--port 10000syntax but that does not work.
Understanding structure of your web application
Let’s now understand the cod structure generated by Vapor CLI. Below is the code generated by vapor new command.
├── CONTRIBUTING.md
├── Package.resolved
├── Package.swift
├── Public
│   ├── images
│   │   └── it-works.png
│   └── styles
│       └── app.css
├── README.md
├── Resources
│   └── Views
│       ├── base.leaf
│       ├── hello.leaf
│       └── welcome.leaf
├── Sources
│   ├── App
│   │   ├── Controllers
│   │   ├── Models
│   │   ├── app.swift
│   │   ├── boot.swift
│   │   ├── configure.swift
│   │   └── routes.swift
│   └── Run
│       └── main.swift
├── Tests
│   ├── AppTests
│   │   └── AppTests.swift
│   └── LinuxMain.swift
├── circle.yml
└── web.Dockerfile
Package.swift and Package.resolved
Swift package manager is the build tool used in Swift applications. Like any build tool it is responsible for building, downloading, compiling, and linking dependencies.
The structure of the build script consist of package descriptions. Each package object is created using name, dependencies, and targets as shown below.
let package = Package(
    name: "bloggy",
    dependencies: [
        // 💧 A server-side Swift web framework.
        .package(url: "https://github.com/vapor/vapor.git", from: "3.0.0"),

        // 🍃 An expressive, performant, and extensible templating language built for Swift.
        .package(url: "https://github.com/vapor/leaf.git", from: "3.0.0"),
    ],
    targets: [
        .target(name: "App", dependencies: ["Leaf", "Vapor"]),
        .target(name: "Run", dependencies: ["App"]),
        .testTarget(name: "AppTests", dependencies: ["App"])
    ]
)
As shown in the above build script
- We created a package name
bloggy - This package has two main dependencies –
vaporandleaf. The packages along with their dependencies are downloaded from the Github directly and then build on your machine. All dependencies use Semantic Versioning (SemVer). This is different from Java where you download binary files from repository manager like Nexus or Artifactory. All the artifacts are downloaded in the.builddirectory. You can find source code and Git repo information in thecheckoutsandrepositoriesfolder inside the.builddirectory. - Finally, the file defined three targets. A target specify a product and its dependencies. A target can depend on other targets. Each of the target name corresponds to one of the source folder.
- The target
Appbuilds the App module for the code under theAppdirectory. - The target
Runcorresponds to theRundirectory. It executes themain.swiftfile.Runmodule has dependency on theAppmodule. - The target
AppTestscorrespond to the source under theTests/AppTestsdirectory.AppTestsmodule has dependency on theAppmodule.
The vapor CLI makes it easy to interact with the Swift package manager. The swift build is the command used by vapor CLI to build, test, and run apps.
The Package.resolved records all the resolved version of the dependencies. It should be committed to the version control system.
Public folder
This folder stores the static files that your application might need to serve like images, favicon.ico, stylesheets, etc.
It is configured as a middleware in the Sources/App/configure.swift.
middlewares.use(FileMiddleware.self) // Serves files from `Public/` directory
If you comment this file then it will stop working.
If you want that Static folder should be used instead of the Public folder you can create new instance of FileMiddleware and specific the public directory as shown below.
middlewares.use(FileMiddleware(publicDirectory: "Static"))
You will have to rename Public folder to Static.
Resources folder
It contains leaf templates. Leaf is a templating library used by vapor. We will cover it in depth in the second part.
It is also configured in the configure.swift file.
Sources folder
It stores all the application source code.
The app.swift is used to create an instance of the application.
The boot.swift gives you a hook into the application lifecycle. You can write code here that is called after your app is booted but before it has started running.
Let’s assume we want to show a banner on the console. We can add print statement as shown below.
public func boot(_ app: Application) throws {
    // Your code here
    print("""

#####  #       ####   ####   ####  #   #
#    # #      #    # #    # #    #  # #
#####  #      #    # #      #        #
#    # #      #    # #  ### #  ###   #
#    # #      #    # #    # #    #   #
#####  ######  ####   ####   ####    #

""")
}
Now, when you build and run the app you will see that in the console.
➜  bloggy git:(master) ✗ vapor run --port=10000
Running bloggy ...

#####  #       ####   ####   ####  #   #
#    # #      #    # #    # #    #  # #
#####  #      #    # #      #        #
#    # #      #    # #  ### #  ###   #
#    # #      #    # #    # #    #   #
#####  ######  ####   ####   ####    #

Running default command: .build/debug/Run serve
Server starting on http://localhost:10000
The configure.swift file gives you a way to configure your Vapor application. You use it to configure middleware, view providers, and other configuration.
The routes.swift defines the routes exposed by the application. We have two routes configured in our web application — index and hello route. As we start building our application we will be adding more routes into the file.
Tests folder
It contains the unit test cases for code in the App folder. We will cover testing in detail later in this series.
web.Dockerfile
This is the Dockerfile to build the Docker image and run the application in a container.
We can build the Docker image using the following command.
docker build --build-arg env=docker -t bloggy -f web.Dockerfile .
Once image is built we can run the image as shown below.
docker run -d -p 8000:80 bloggy
The application will be accessible at http://localhost:8000
Conclusion
That’s it for today. Today, we got the setup done and understood how to get started with server-side development in Swift. I will keep posting the articles in this series every week. So, make sure to follow this blog.
Discover more from Shekhar Gulati
Subscribe to get the latest posts sent to your email.
