Recently, I wanted to load test one of my applications. In my previous projects, I have used Apache JMeter and Gatling. Both of them are great tools but I wanted something with ease of Apache Benchmark and web user interface. In my limited experience with Gatling and JMeter, I found that it takes time to get started with these tools. I don’t use these tools daily so there is always a learning curve for me.
My quest for an easy to use load testing tool lead me to Locust. It took me no time to get started with the tool and I was able to understand performance characteristics of my application by running a load test. I found Locust a great tool if you want to find how many request per second your system can support and how response time varies for different percentiles of requests.
Locust is an open source load testing tool written in Python. It can simulate millions of users to load test your application. It has an intuitive user interface that you can use to easily get started with it. It allows you to define custom behaviour using Python code.
Installing Locust on your machine
We will start with setting up development environment . I use Python virtualenv for most of my Python applications. It helps keep my project environment separate and does not pollute global Python installation. Please refer to official documentation for installation instructions.
Once you have virtualenv installed, open a command-line terminal and navigate to a convenient directory on your file system. Make a new directory called load-tests and change directory to it.
$ mkdir load-tests && cd load-tests
Once inside the load-tests directory, create a Python virtualenv and activate it.
$ virtualenv pyeth
$ source pyeth/bin/activate
(pyeth) $  load-tests
Now, you can install Locust using the command shown below.
$ pip install locustio
Running Locust tests
You can run Locust by running the following command
(pyeth) $ locust --host=https://jsonplaceholder.typicode.com --locustfile locustfile.py
The command shown below will start the locust server. The host option tell locust which host to load test. We are using a fake online REST API server for testing. The locustfile option tells the path of the locust file. This Python file defines how to load test your application. The simple locustfile.py is shown below.
from locust import HttpLocust, TaskSet, task
import json

class UserBehavior(TaskSet):

    @task(1)
    def create_post(self):
        headers = {'content-type': 'application/json','Accept-Encoding':'gzip'}
        self.client.post("/posts",data= json.dumps({
      "title": "foo",
      "body": "bar",
      "userId": 1
    }),
    headers=headers,
    name = "Create a new post")


class WebsiteUser(HttpLocust):
    task_set = UserBehavior
The code shown above makes will make HTTP POSST request to create a todo item. We passed headers using the headers dictionary. We also gave name to the test Create a new post.
When you run the locust --host=https://jsonplaceholder.typicode.com --locustfile locustfile.py command, the locust server will start at localhost:8089. You can open the http://localhost:8089 in your favourite browser to view the Locust user interface.

The locust ask you to specify two values:
- Number of users to simulate: This is the total number of users you want to simulate. For example, if you want to see how your application behaves with 100 concurrent users.
- Hatch rate: This is the rate at which users should be spawned. For example, you want 100 concurrent users but you want them spawned at the rate of 10 per second. This means you will have 100 concurrent users at the end 10 seconds. From 11th second, your application will be load tested with 100 concurrent users.
Now, you can press the Start swarming button to load test the URL. Please don’t overwhelm the jsonplaceholder API.
After a minute or so, you can start seeing how your server is responding. You can see the number of requests per second it can server as well as how response time is varying over time

As you can see, server is able to handle 20 RPS when load tested with 100 concurrent users. The median response time is 3000ms to 4000ms and 95% percentile response time 3200ms to 4600ms.
Running locust in command-line mode
It is possible to run the load tests without the user interface. You can run that using the locust CLI as shown below.
$ locust --host=https://jsonplaceholder.typicode.com --locustfile locustfile.py --no-web -c 100 -r 10 -t 1m --print-stats
The above command will spawn the users at 10 per second till it reaches 100. The test will run for 1 minute. We have explicitly said that we don’t want web user interface and we want to print stats to the command line.
The output of the test is as shown below.
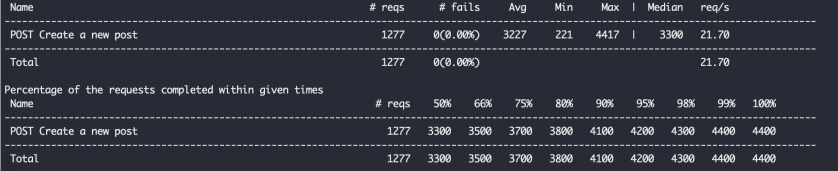
The output above shows the RPS as well as response time for different percentile.
Running a load test with distribution of requests
We wanted to run a load test where 50% of the request were of type A and remaining 50% were of type B. It is easy to write such tests with Locust. Just add one more task in your locust file as shown below.
from locust import HttpLocust, TaskSet, task
import json

class UserBehavior(TaskSet):

    @task(1)
    def create_post(self):
        headers = {'content-type': 'application/json','Accept-Encoding':'gzip'}
        self.client.post("/posts",data= json.dumps({
      "title": "foo",
      "body": "bar",
      "userId": 1
    }),
    headers=headers,
    name = "Create a new post")

    @task(1)
    def list_post(self):
        headers = {'content-type': 'application/json','Accept-Encoding':'gzip'}
        self.client.get("/posts",
    headers=headers,
    name = "List all posts")


class WebsiteUser(HttpLocust):
    task_set = UserBehavior
If you run the load test again, you will see the following report.

If you compare this result with the load test result with just POST request. You will see that we are able to serve two times the requests. Also, we can see the GET request is cheap compared to POST request. This is expected as GET can be cached so server has to do less work to return the results.
Conclusion
I found Locust an amazing tool. It is easy to use, supports testing REST API out of the box using HttpClient, extensible, and gives an easy way to specify what you want to do in your test. Give it a shot for load testing your application.
Discover more from Shekhar Gulati
Subscribe to get the latest posts sent to your email.

According to the locustio docs, you can just self.client.post(…, json={“name”: “value”}, …) to get a JSON POST body.
| post(self, url, data=None, json=None, **kwargs)
| Sends a POST request. Returns :class:`Response` object.
|
| :param url: URL for the new :class:`Request` object.
| :param data: (optional) Dictionary, list of tuples, bytes, or file-like
| object to send in the body of the :class:`Request`.
| :param json: (optional) json to send in the body of the :class:`Request`.
| :param \*\*kwargs: Optional arguments that “request“ takes.
| :rtype: requests.Response
Good article. Well explained.
But how can we achieve unique users for each request?
Something similar to this: https://www.redline13.com/blog/2018/01/load-test-with-unique-users/
Shekhar- Is there a way to create these python file using postman collection file? I am asking this because we do functional testing using postman and recreating test in python file will be a duplication of effort so just trying to identify if we have a hack or a trick to do it easily?